I had the “pleasure” of visiting the DMV this week to apply for a driving
permit for my oldest kid. By a miraculous sequence of events, we got the permit
in a single visit, but it was a close call.
Because the permit will eventually turn into a driver’s license and therefore a
REAL ID, the application required two different documents to provide proof of
address. There is a long list of valid documents, such as utility bills and
property tax bills, and furthermore the DMV recognizes that not everyone living
at an address receives such bills:
What if I do not have one of the above residency documents?
You can use a
relative’s (parent, child, spouse/domestic partner) residency document if you
live at the same address and provide a document (such as a birth or marriage
certifcate [sic]) that shows that relationship.
It all seems reasonable enough, but the rules are implemented like a
poorly-written computer program.
The question is, can I use my driver’s license (together with a birth
certificate) as proof of my teen’s residency? In theory, this should count as
definitive proof of address, since they required me to show two address
documents in order to receive the license in the first place. At the very
least, it should count as one of the two factors, at least as valid as a
SoCalGas bill that anyone with a basic PDF editor could easily doctor.
In practice, as you have probably guessed, it counts as nothing. Why? Because
the main list of documents is written assuming that they are in the name of the
applicant, and this “relative’s residency document” special case is tacked on
at the end. And of course, it would be silly to say that you could use your
current REAL ID as proof of address to get a REAL ID, so thus you cannot use a
relative’s REAL ID as proof of address to get your REAL ID.
Being a paranoid person, I brought two documents in addition to my driver’s
license, but even that was almost not enough. See, my address can be written as
either 221B Baker St or 221 Baker St #B. The two bills that I brought didn’t
match, which (1) was apparently a problem and (2) my driver’s license wasn’t
going to get me out of it. The only thing that saved me
(this is the miraculous part)
was that one of the two bills had the address written both ways.
(For completeness, two other miracles. One, that my kid passed the
ridiculous written exam
on the first try.
A test that did have a question about
NEVs without
explaining the acronym, and is known for questions like “In which of these
locations is it illegal to park? (a) blocking an unmarked crosswalk (b) in a
bicycle lane or (c) within three feet of a driveway.” The answer is (a). Nobody
knows why. The second miracle is that my teen even got to take the test in the
first place, because the DMV shut down the testing center at 4:30 on the dot,
sending away everyone who was in line at the time. Credit for this miracle goes
to the employee who processed our application, because she shut down her
station and went over to the photo station to clear out the queue, getting us
through and into the testing center with less than a minute to spare. At the
time, we had no idea that we were up against a clock, but I’m pretty sure that
she knew and intervened.)
Anyway, now it is time for 50 hours of supervised (by me) driving practice.
Wish us luck!
I have a 5-year-old Brother Scanner (the ADS-1700W) that serves me pretty well. It is small enough to keep on my desk, fast, and has a Wi-Fi connection. But getting scans from the scanner to the computer is sometimes bothersome. My primary way of using it is to scan to a network folder on my home server, which is great for archiving things, but not so great for family members or when I need something right away.
My preferred way to get a quick scan is by email. You immediately have it on whatever device you are using, and you have it saved for later if you need it. The Brother Scanner has a scan-to-email function, but it is buggy. Specifically, it sends slightly malformed emails that Fastmail accepts but Gmail returns to sender.
But since network scanning is rock solid, last year I wrote a program to watch a set of folders and send by email whatever files it finds. I was on a bit of a Go kick at the time, and I think Go works pretty well for the task.
Here is the relatively short program that I wrote. It is meant to be running as a daemon, and as long as it is running, it will email you all the files that it finds. Since the interesting parts are at the end and I don’t think anyone will read that far, I’ll show you the program in reverse order, starting with the main function.
 96
 97
 98
 99
100
101
102
103
104
105
106
107
108
109
110
111
112
113
114
|
func main() {
    fmt.Println("Starting up")
    changes := make(chan int)
    go waitForChange(changes)

    ticks := time.Tick(5 * time.Minute)
    for {
        err := filepath.Walk("/home/scanner/incoming", sendFile)
        if err != nil {
            fmt.Println(err)
        }
        select {
        case <-changes:
            fmt.Println("File changed, looking for emails to send")
        case <-ticks:
            fmt.Println("5m has passed, looking for emails to send")
        }
    }
}
|
We start up, print a nice message and make a channel, which is a Go structure that allows us to pass data, in this case integers, between different threads of the program. We call it changes because it will notify us every time there has been a filesystem change.
The go keyword on line 99 starts waitForChange on a separate thread, which is a good thing for us, because you will later see that it runs an infinite loop. We pass it the channel so that it can notify us when it sees a change.
On line 101 we get a Ticker channel, which will receive a signal every five minutes. Since I don’t completely trust that I will be notified every time a file changes, every once in a while we want to look through the directories to see if we find anything.
Starting at line 102, we have an infinite loop here in the main thread. This starts by mailing out any files that are waiting. Then we get to the select statement, which pauses and listens to both the changes channel, and the ticks channel. The somewhat strange arrow syntax means that we are attempting to read values from the channel. If we wanted, we could assign the values we read to a variable and do something with them, but we don’t care what is on the channels. As soon as another thread writes to one of these channels (whichever channel comes first), we write the corresponding log statement and then continue back to the top of the for loop, which mails out any files we find, and then goes back to waiting for action on the channels.
By having the two channels, we have programmed the logic to walk the filesystem every time we see a change and every 5 minutes, but, crucially, never more than once at a time. In reality, the change watcher is very reliable, and the email generally arrives seconds after the paper comes out of the scanner.
83
84
85
86
87
88
89
90
91
92
93
94
|
func waitForChange(c chan<- int) {
    defer close(c)
    for {
        cmd := exec.Command("/usr/bin/inotifywait", "-r", "-e", "CLOSE_WRITE", "/home/scanner/incoming")
        err := cmd.Run()
        if err != nil {
            fmt.Printf("%v\n", err)
            time.Sleep(5 * time.Minute)
        }
        c <- 0
    }
}
|
Here is the waitForChange function, which just calls inotifywait. This in turn runs until someone writes a file and then exits. At this point, our function writes 0 into the channel, which kicks the main thread into action. Meanwhile this thread calls inotifywait again, to begin waiting for the next change.
56
57
58
59
60
61
62
63
64
65
66
67
68
69
70
71
72
73
74
75
76
77
78
79
80
81
|
func sendFile(path string, info os.FileInfo, err error) error {
    if err != nil {
        return err
    }
    if info.IsDir() {
        return nil
    }
    to, err := getToAddress(path)
    if err != nil {
        return err
    }
    isOpen, err := fileIsOpen(path)
    if err != nil {
        return err
    }
    if isOpen {
        return fmt.Errorf("Skipping %v because it is opened by another process\n", path)
    }
    if err := sendEmail(to, path); err != nil {
        return err
    }
    if err := os.Remove(path); err != nil {
        return err
    }
    return nil
}
|
This sendFile function is called on every file in the directory tree. This is where Go gets annoyingly verbose. So much error handling! But fairly straightforward. As we walk the tree, we skip directories, send out emails if we have a file, and then delete the file after we send it.
44
45
46
47
48
49
50
51
52
53
54
|
func fileIsOpen(path string) (bool, error) {
    cmd := exec.Command("/usr/bin/lsof", "-t", path)
    err := cmd.Run()
    if err == nil {
        return true, nil
    }
    if exitError, ok := err.(*exec.ExitError); ok && exitError.ExitCode() == 1 {
        return false, nil
    }
    return true, err
}
|
This fileIsOpen function wasn’t there at first, but my early tries sent out files that were still being uploaded. Live and learn.
26
27
28
29
30
31
32
33
34
35
36
37
38
39
40
41
42
|
func sendEmail(to string, doc string) error {
    msg := gomail.NewMessage()
    msg.SetHeader("From", "scanner@xxxx")
    msg.SetHeader("To", to)
    msg.SetHeader("Subject", "Here is your scanned document")
    msg.SetBody("text/plain", "")
    msg.Attach(doc)

    n := gomail.NewDialer("smtp.example.com", 465, "user", "pass")

    if err := n.DialAndSend(msg); err != nil {
        return err
    }

    fmt.Printf("Sent %v to %v\n", doc, to)
    return nil
}
|
It is relatively simple to send an email using this third-party gomail package. And it isn’t malformed like the scanner’s attempts to send email!
12
13
14
15
16
17
18
19
20
21
22
23
24
|
func getToAddress(path string) (string, error) {
    var addresses = map[string]string{
        "amy":        "xxx@yyyy",
        "nathan":     "xxx@wwww",
    }

    _, lastDirName := filepath.Split(filepath.Dir(path))
    to, ok := addresses[lastDirName]
    if !ok {
        return "", fmt.Errorf("No email address available for %v", lastDirName)
    }
    return to, nil
}
|
This is a relatively simple function that decides who to email to based on the folder that the file is in. This is the abbreviated version; my older kids also have emails configured here.
 1
 2
 3
 4
 5
 6
 7
 8
 9
10
|
package main

import (
    "fmt"
    gomail "gopkg.in/gomail.v2"
    "os"
    "os/exec"
    "path/filepath"
    "time"
)
|
Finally, the most boring part of all, the import section.
I bought a new computer. The Beelink U59 Mini PC 11th Gen 4-Cores
N5105 cost me $120 from Amazon. It has a somewhat
recent Intel Processor, 8GB RAM and a 500 GB SSD. It came with Windows
installed, but I erased it and installed Debian with no GUI. It came with
instructions to configure autoboot on power failure so I can hide it away in a
closet.
This fills a gap I’ve had for some time. My house has been laptop-only for
several years now, which leaves me nowhere to run always-on automation things.
I have a Synology that I use for storage, but it is very low powered and
somewhat hard to configure. My blog is served from a Linode virtual server,
which can also fill this gap, but it is also resource-limited, less secure, and
far from most of my data.
It has been fun to play with. I migrated some things from Linode to my
home server and downsized the Linode. I set up a reverse proxy for my printer
and scanner so that I can access the admin pages from outside of my house. I
set up a Gitea server for some of my personal
things. We will see what other useful purposes it can serve.
On Sunday, I was reading a page on Wikipedia, when this quote caught
my attention:
The Gregorian leap cycle, which has 97 leap days spread across 400 years,
contains a whole number of weeks (20871).
This is somewhat surprising to me, since I assume that this was by
accident and not by design, which means there was only a 1-in-7 chance
of it happening.
One result of this is that the calendar for 2000 is the same as the calendar
for 2400, which makes a perpetual calendar such as this one
quite a bit easier to specify.
Another consequence is that not every calendar is equally likely, which
I captured in this silly Mastodon post:
Did you know that October 8 is 3.5% less likely to fall on a Sunday than a
Saturday? Enjoy your rare day!
I have few followers, but I was pretty sure my old internet pal Dr. Drang would
take the bait (he did).
If I were more patient, I could have waited until next February 29, which falls
on a Thursday. Since leap days are more rare than non-leap days, the disparity
is greater, and my 3.5% could have been 14%. Wednesday is the more common day
for February 29, which again reminds us that we are currently on one of the
less common paths through the perpetual calendar.
But calendars are fun to think about, so I didn’t stop there.
A year is about 365.24219 days
long. The Julian calendar has a leap year every 4 years, for an average year
length of 365.25 days. The error, of course, adds up relatively quickly,
as we eventually noticed.
The Gregorian calendar skips leap years on years divisible by 100, unless they
are also divisible by 400, leaving the 97 leap years per 400 years quoted
above. This makes a year on average 365 + 97/400 = 365.2425 days long, which is
closer! It takes 3,225 years before you drift a day, which I guess is good
enough?
At this point, I stumbled upon the Revised Julian calendar,
which skips leap years on years divisible by 100, unless they are also
either 200 or 600 mod 900. This makes a year 365 + 218/900 = 365.24222 days long,
which is even better. Now it takes over 30,000 years before you drift a day.
The rule is much more confusing, though, although it has the benefit (by
design) that it matches the Gregorian calendar exactly for the years 1600-2799.
This lets you claim you are following a more accurate calendar without really
making a fuss. Also, 900 years of the Revised Julian calendar is not a whole
number of weeks, so the Revised Julian perpetual calendar would actually have a
6,300-year cycle.
Finally, I spent some time thinking about what I would have done to handle the
leap year problem if I ran the world. The answer is so obvious that it makes
you doubt the wisdom of our ancestors. The Julian calendar drifts by 1 day
every 128 years. We could have had a calendar (could I call it the Griggorian?)
that had leap years every year divisible by 4
except those also divisible by 128.
This gets you a year with an average length of 365 + 31/128 = 365.2421875
days, which would mean one day of drift every 400,000 years.
I admit that computing divisibility by 128 is harder (for a human) than 400, but
otherwise the rule is clearly simpler. The other downside is that 128 years of
this calendar is not a whole number of weeks, which means that the perpetual
calendar would have a 896-year cycle. But as long as I’m in charge, we might as
well solve that by starting every year on a Sunday.
I bought an electric car last month, which got me interested in my electric bill.
I was surprised to find out that my electric company lets you export an hour-by-hour
usage report for up to 13 months.
There are two choices of format: CSV and XML. I deal with a lot of CSV files at work, so
I started there. The CSV file was workable, but not great. Here is a snippet:
"Data for period starting: 2022-01-01 00:00:00  for 24 hours"
"2022-01-01 00:00:00 to 2022-01-01 01:00:00","0.490",""
"2022-01-01 01:00:00 to 2022-01-01 02:00:00","0.700",""
The “Data for period” header was repeated at the beginning of every day. (March 13,
which only had 23 hours due to Daylight Saving Time adjustments, also said
“for 24 hours”.) There were some blank lines. It wouldn’t have been hard to delete the
lines that didn’t correspond to an hourly meter reading, especially with BBEdit, Vim, or
a spreadsheet program. But I was hoping to write something reusable in Python, preferably
without regular expressions, so I decided it might be easier to take a crack at the XML.
Here is the general structure of the XML:
<entry>
  <content>
    <IntervalBlock>
      <IntervalReading>
        <timePeriod>
          <duration>3600</duration>
          <start>1641024000</start>
        </timePeriod>
        <value>700</value>
      </InvervalReading>
    </IntervalBlock>
  </content>
</entry>
Just like the CSV, there is an entry for each day, called an IntervalBlock. It has some
metadata about the day that I’ve left out because it isn’t important. What I care about
is the IntervalReading which has a start time, a duration, and a value. The start time
is the unix timestamp of the beginning of the period, and the value is Watt-hours.
Since each time period is an hour, you can also interpret the value as the average
power draw in Watts over that period.
XML is not something I deal with a lot day to day, so I had to read some Python docs, but
it turned out very easy to parse:
from xml.etree import ElementTree
from datetime import datetime
import pandas as pd
import matplotlib.pyplot as plt

ns = {'atom': 'http://www.w3.org/2005/Atom', 'espi': 'http://naesb.org/espi'}
tree = ElementTree.parse('/Users/nathan/Downloads/SCE_Usage_8000647337_01-01-22_to_12-10-22.xml')
root = tree.getroot()
times = [datetime.fromtimestamp(int(x.text))
         for x in root.findall("./atom:entry/atom:content/espi:IntervalBlock/espi:IntervalReading/espi:timePeriod/espi:start", ns)]
values = [float(x.text)
          for x in root.findall("./atom:entry/atom:content/espi:IntervalBlock/espi:IntervalReading/espi:value", ns)]
ts = pd.Series(values, index=times)
The ns dictionary allows me to give aliases to the XML namespaces to save typing.
The two findall commands extract all of the start tags and all of the value tags.
I turn the timestamps into datetimes and the values into floats. Then a make them into
a Pandas Series (which, since it has a datetime index, is in fact a time series).
My electricity is cheaper outside of 4-9 p.m., so night time is the most convenient time
to charge. I made a quick visualization of the last year by restricting myself from
midnight to 4:00 a.m. andtaking the average of each day.
Then I plotted it without lines and with dots as markers:
plt.plot(ts[ts.index.hour<4].groupby(lambda x: x.date).mean(), ls='None', marker='.')
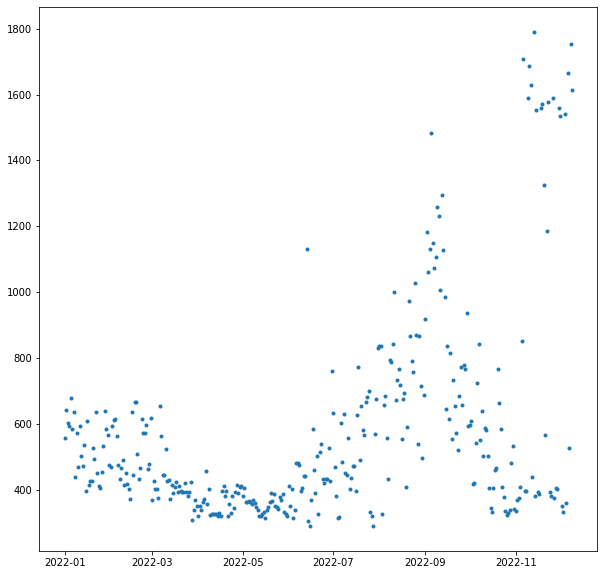
As expected, you see moderate use in the winter from the heating (gas, but with an
electric blower). Then a lull for the in-between times, a peak in the summer where there
is sometimes a bit of AC running in the night, another lull as summer ends, and then
a bit of an explosion when I started charging the car.
For now, I am actually using a 120 V plug which can only draw 1 to 1.5 kW and is a slow
way to charge a car. Eventually I will get a 240 V circuit and charger, increase the
charging speed 5x, and have even bigger spikes to draw.
I’m back from a blogging hiatus for a quick complaint about the sorry state of
Amazon’s account system, especially when it comes to households and minors.
Everything that follows is to the best of my knowledge, and only includes the
features I actually use.
A regular Amazon account can be used for shopping, Kindle, and Prime Video
(among other things). You can have a maximum of two regular Amazon accounts in
a household, and they can share Prime shipping benefits and Kindle purchases,
but not Prime Video. However, under the primary member’s Prime Video login, you
can have sub-profiles to separate household members.
On a Kindle device, you can share ebook purchases with minors using Amazon
Kids. This is not a true Amazon or Kindle account, but a sub-account within a
regular Amazon account. That is, you sign into the Kindle with the parent’s
account and then enter Kid Mode. All purchases (or library check-outs) must be
made on the parent’s account and then copied over to the child’s library using
a special Amazon dashboard.
Note that Amazon Kids+ is a different product: it is basically Kindle Unlimited
for Amazon Kids accounts. I have used it and I think the selection is terrible.
For example, they love to carry the first book of a series but not the
remainder of the series. Also, when I last used it, there was no way to know
which books are available through Amazon Kids+ short of searching for the book
on a kid’s device.
There is a shopping feature called Amazon Teen. This is essentially a regular
Amazon account, but it is linked to a parent’s account, and purchases are
charged to the parent’s card, with the option to require purchase-by-purchase
approval from the parent. This is a way to share Prime shipping features with a
teenager, and the only way to share Prime shipping with more than a single
person in your househould. Crucially, Amazon Teen accounts cannot purchase
Kindle books, log into a Kindle device, or share Kindle purchases with the
parent’s account.
Until now, I have mostly survived in the Amazon Kids world, despite the
friction involved in getting a book onto a kid’s device. My kids have mostly
adapted by ignoring their Kindles and reading books in Libby on their phones.
This isn’t a good fit for my teen and tween, who need to read books at school.
They are not allowed to use phones at school, but are allowed to use e-ink
Kindles.
Everything came to a head this weekend, when I tried to make them both Amazon
Teen accounts, which are useful in their own right. (The current practice is
that they text me an Amazon link when they need something, and it will be nice
for them to be a little be more self-sufficient.) This was before I knew that
Amazon Teen accounts couldn’t buy Kindle books (why?), so I then attempted to
create them each a second account, not linked to mine in any way, for Kindle
purposes.
That is when things came to a screeching halt, but this is at least partially
my fault. While I had been looking into this, I was downloading Kindle books to
my computer using a Keyboard Maestro script that simulated the five clicks
required for each download. I’m pretty sure that this triggered some
robot-defensive behavior from Amazon, which made it impossible for me to create
an account without a cell phone attached to the account. But all of our
household phone numbers are already attached to other accounts, and attempting
to remove them put me into an infinite loop of asking for passwords and asking
for OTPs.
I eventually solved this problem in two different ways. One involved talking to
a human at Amazon’s tech support, which I admit is better than many of the
other tech companies at solving this kind of problem. The other involved a VPN,
which seems to have freed me from bot-suspicion.
But in the end, I also put in an order for a Kobo. I’m told they can sync
directly with Libby for library checkouts, unlike Amazon which requires a
complex multi-click dance which might prevent my kids from using their Kindles
even if I do get their accounts squared away. And these are the last major
micro-USB devices in the house, so maybe the time has come to move on.
Ironically, the only way I could find a Kobo that shipped in less than a week
was to buy it from Amazon.
The last couple restaurants I’ve visited used Toast for payments, and this is what QR codes were meant for. The receipt has a QR code specific to your order, on iOS it opens an App Clip, and you can pay with Apple Pay.
Great experience, especially compared to the old way. Waiting for the server to pick up and return your credit card is the worst.
[Update: Since I first wrote this, Fastmail switched from using HTTP
BasicAuth to Bearer Authorization. I have updated the script to match.]
I use Fastmail for my personal email, and I like to
keep a backup of my email on my personal computer. Why make a backup? When I am done reading or
replying to an email, I make a split-second decision on whether to delete or
archive it on Fastmail’s server. If it turns out I deleted something that I need later, I can always
look in my backup. The backup also predates my use of Fastmail and serves as a
service-independent store of my email.
My old method of backing up the email was to forward all my email to a Gmail
account, then use POP to download the email with a hacked-together script. This
had the added benefit that the Gmail account also served as a searchable backup.
Unfortunately the Gmail account ran out of storage and the POP script kept
hanging for some reason, which together motivated me to get away from this
convoluted backup strategy.
The replacement script uses JMAP to connect directly to
Fastmail and download all messages. It is intended to run periodically, and
what it does is pick an end time 24 hours in the past, download all email older than
that, and then record the end time. The next time it runs, it searches for mail
between the previous end time and a new end time, which is again 24 hours in
the past.
Why pick a time in the past? Well, I’m not confident that if you search up until
this exact moment, you are guaranteed to get every message. A message could come
in, then two seconds later you send a query, but it hits a server that doesn’t
know about your message yet. I’m sure an hour is more than enough leeway, but
since this is a backup, we might as well make it a 24-hour delay.
Note that I am querying all mail, regardless of which mailbox it is in, so even
if I have put a message in the trash, my backup script will find it and
download it.
JMAP is a modern JSON-based replacement for IMAP and much easier to use, such
that the entire script is 140 lines, even with my not-exactly-terse use of
Python.
Here is the script, with some notes below.
  1
  2
  3
  4
  5
  6
  7
  8
  9
 10
 11
 12
 13
 14
 15
 16
 17
 18
 19
 20
 21
 22
 23
 24
 25
 26
 27
 28
 29
 30
 31
 32
 33
 34
 35
 36
 37
 38
 39
 40
 41
 42
 43
 44
 45
 46
 47
 48
 49
 50
 51
 52
 53
 54
 55
 56
 57
 58
 59
 60
 61
 62
 63
 64
 65
 66
 67
 68
 69
 70
 71
 72
 73
 74
 75
 76
 77
 78
 79
 80
 81
 82
 83
 84
 85
 86
 87
 88
 89
 90
 91
 92
 93
 94
 95
 96
 97
 98
 99
100
101
102
103
104
105
106
107
108
109
110
111
112
113
114
115
116
117
118
119
120
121
122
123
124
125
126
127
128
129
130
131
132
133
134
135
136
137
138
139
140
141
142
|
import argparse
import collections
import datetime
import os
import requests
import string
import sys
import yaml

Session = collections.namedtuple('Session', 'headers account_id api_url download_template')


def get_session(token):
    headers = {'Authorization': 'Bearer ' + token}
    r = requests.get('https://api.fastmail.com/.well-known/jmap', headers=headers)
    [account_id] = list(r.json()['accounts'])
    api_url = r.json()['apiUrl']
    download_template = r.json()['downloadUrl']
    return Session(headers, account_id, api_url, download_template)


Email = collections.namedtuple('Email', 'id blob_id date subject')


def query(session, start, end):
    json_request = {
        'using': ['urn:ietf:params:jmap:core', 'urn:ietf:params:jmap:mail'],
        'methodCalls': [
            [
                'Email/query',
                {
                    'accountId': session.account_id,
                    'sort': [{'property': 'receivedAt', 'isAscending': False}],
                    'filter': {
                        'after': start.isoformat() + 'Z',
                        'before': end.isoformat() + 'Z',
                    },
                    'limit': 50,
                },
                '0',
            ],
            [
                'Email/get',
                {
                    'accountId': session.account_id,
                    '#ids': {
                        'name': 'Email/query',
                        'path': '/ids/*',
                        'resultOf': '0',
                    },
                    'properties': ['blobId', 'receivedAt', 'subject'],
                },
                '1',
            ],
        ],
    }

    while True:
        full_response = requests.post(
            session.api_url, json=json_request, headers=session.headers
        ).json()

        if any(x[0].lower() == 'error' for x in full_response['methodResponses']):
            sys.exit(f'Error received from server: {full_response!r}')

        response = [x[1] for x in full_response['methodResponses']]

        if not response[0]['ids']:
            return

        for item in response[1]['list']:
            date = datetime.datetime.fromisoformat(item['receivedAt'].rstrip('Z'))
            yield Email(item['id'], item['blobId'], date, item['subject'])

        # Set anchor to get the next set of emails.
        query_request = json_request['methodCalls'][0][1]
        query_request['anchor'] = response[0]['ids'][-1]
        query_request['anchorOffset'] = 1


def email_filename(email):
    subject = (
            email.subject.translate(str.maketrans('', '', string.punctuation))[:50]
            if email.subject else '')
    date = email.date.strftime('%Y%m%d_%H%M%S')
    return f'{date}_{email.id}_{subject.strip()}.eml'


def download_email(session, email, folder):
    r = requests.get(
        session.download_template.format(
            accountId=session.account_id,
            blobId=email.blob_id,
            name='email',
            type='application/octet-stream',
        ),
        headers=session.headers,
    )

    with open(os.path.join(folder, email_filename(email)), 'wb') as fh:
        fh.write(r.content)


if __name__ == '__main__':
    # Parse args.
    parser = argparse.ArgumentParser(description='Backup jmap mail')
    parser.add_argument('--config', help='Path to config file', nargs=1)
    args = parser.parse_args()

    # Read config.
    with open(args.config[0], 'r') as fh:
        config = yaml.safe_load(fh)

    # Compute window.
    session = get_session(config['token'])
    delay_hours = config.get('delay_hours', 24)

    end_window = datetime.datetime.utcnow().replace(microsecond=0) - datetime.timedelta(
        hours=delay_hours
    )

    # On first run, 'last_end_time' wont exist; download the most recent week.
    start_window = config.get('last_end_time', end_window - datetime.timedelta(weeks=1))

    folder = config['folder']

    # Do backup.
    num_results = 0
    for email in query(session, start_window, end_window):
        # We want our search window to be exclusive of the right endpoint.
        # It should be this way in the server, according to the spec, but
        # Fastmail's query implementation is inclusive of both endpoints.
        if email.date == end_window:
            continue
        download_email(session, email, folder)
        num_results += 1
    print(f'Archived {num_results} emails')

    # Write config
    config['last_end_time'] = end_window
    with open(args.config[0], 'w') as fh:
        yaml.dump(config, fh)
|
The get_session function is run once at the beginning of the script, and
fetches some important data from the server including the account ID and a
URLs to use.
The query function does the bulk of the work, sending a single JSON request
multiple times to page through the search results. It is actually a two-part
request, first Email/query, which returns a list of ids, and then
Email/get, which gets some email metadata for each result. I wrote this as a
generator to make the
main part of my script simpler. The paging is performed by capturing the ID of
the final result of one query, and asking the next query to start at that
position plus one (lines 77-78). We are done when the query returns no results
(line 69).
The download_email function uses the blob ID to fetch the entire email and
saves it to disk. This doesn’t really need to be its own function, but it
will help if I later decide to use multiple threads to do the downloading.
Finally, the main part of the script reads configuration from a YAML file,
including the last end time. It loops through the results of query, calling
download_email on each result. Finally, it writes the configuration data back
out to the YAML file, including the updated last_end_time.
To run this, you will need to first populate a config file with the destination
folder and your API token, like this:
token: ffmu-xxxxx-your-token-here
folder: /path/to/destination/folder
You will also need to install the ‘requests’ and ‘pyyaml’ packages using
python -m pip install requests pyyaml. Copy the above script onto your
computer and run it using python script.py --config=config_file. Note
that everything here uses Python 3, so you may have to replace ‘python’
with ‘python3’ in these commands.
Productive couple of days for my rather neglected Linode instance. Upgraded the distro from Ubuntu 14.04 to Debian 10. Moved DNS from Amazon to Google. Moved various static sites from S3 to Linode. Somehow it all still works.
I understand the popularity of email newsletters,
especially for publishers.
It’s a simple way to get paid content out, easier for users than a private RSS feed.
But that doesn’t mean I want to read newsletters in my email app.
Feedbin, which I am already using for my regular RSS subscriptions, bridges the gap.
As part of my Feedbin account, I get a secret email address,
and anything sent to that address ends up in my RSS reader.
Problem solved!
But it quickly gets annoying to sign up for newsletters (often creating an account)
with an email address that is neither memorable nor truly mine.
Fastmail, which I am already using for my regular email, makes it easy to
find specified emails sent to my regular address, forward them to my feedbin address, and put the original in the trash.
In fact, Fastmail lets me use “from a member of a given contact group” as the trigger
for this automatic rule, which makes the setup for a new newsletter very simple:
- Subscribe to the newsletter
- Add the sender to my Fastmail address book
- Add the newly created contact to my “Feedbin” group
This is very convenient, for newsletters as well as other mail that is more of a notification than an email. Here are some of the emails that I now read as though they were feeds:
- Ben Thompson’s Stratechery
- Craig Calcaterra’s Cup of Coffee (baseball)
- Noah Smith’s Noahpinion
- A handful of Washington Post newsletters
- Los Angeles County Covid updates
- UPS My Choice emails